You’re under a deadline fitting a ground strap inside an EV enclosure and can’t reach the back of the panel — how do you get a reliable threaded anchor from one side? Or you’ve installed a nutsert that spins or corrodes, leaving wiring and brackets insecure. Most people assume any blind rivet nut will do or skip proper material and installation details. This piece will show you which blind rivet nut styles stop rotation and vibration, which materials and platings prevent corrosion and maintain low grounding resistance, and the exact hole size, tool type, and torque values to seal and last. You’ll leave knowing the correct part and install steps for reliable, long‑term service. It’s easier than it looks.
Key Takeaways
If you’ve ever tried bolting inside a sealed EV enclosure, this is why.
– You can install from one side when you can’t reach the backside, like fitting a nut into a battery pack casing through a single service hole; install through the hole, pull the mandrel, and the nut forms in place. Example: installing a grounding stud inside an EV battery module through a 14 mm access hole.
Before explaining how to do that reliably, know why it matters in one sentence: you avoid disassembling housings and cutting expensive access panels.
1) Use the right rivet nut size for the panel thickness, typically M6 or M8 for EV enclosures, and pick a steel or stainless grade matched to your environment.
– You get strong, vibration-resistant anchoring because the nut forms bulges, knurls, or splines that grip the host material; this prevents pull-out under road and machine loads. Example: an M8 blind rivet nut in a 3 mm aluminum chassis resists pull forces from road vibration during a 100,000 km fleet test.

Before you try different finishes, know why it matters in one sentence: proper anchoring prevents fastener failure under sustained vibration.
2) For vibration, choose serrated or knurled styles and torque the mating bolt to spec; test with a 10,000-cycle vibration rig if this is a safety-critical joint.
– You can protect threaded joints from torque and misalignment with antirotation and RIV‑FLOAT options, which let the nut rotate slightly during alignment or resist turning during service. Example: using a RIV‑FLOAT M6 nut to align a sensor bracket on an EV motor housing during assembly.
Before using RIV‑FLOAT, know why it matters in one sentence: it saves rework when tolerances stack up during assembly.
3) Use RIV‑FLOAT when you need ±1–2 mm lateral play during bolt insertion, and use antirotation if you expect high installation torque.
– You can achieve reliable electrical grounding and low contact resistance when the rivet nut is installed flush and tightened to the specified torque, creating a consistent contact surface. Example: a stainless M6 rivet nut torqued to 6–8 Nm providing a ground path for a chassis-mounted inverter.
Before selecting materials, know why it matters in one sentence: consistent contact means predictable resistance and safer electrical performance.

4) Clean mating surfaces, use conductive plating if needed, and clamp to the specified torque (follow the bolt and nut manufacturer’s Nm value) to hit target contact resistance.
– You simplify production and maintenance with fast, repeatable installs using the right tooling, which reduces fixturing and cycle time on the line. Example: a pneumatic blind-rivet-nut setter installing 200 nuts per hour on an equipment housing assembly line.
Before changing tooling, know why it matters in one sentence: repeatable installs cut assembly time and scrap.
5) Match tooling to nut size, set cycle pressure correctly, and program stroke length if using a servo press; measure pull force on first 10 installs and adjust as needed.
If you want, I can give a short checklist for selecting nut type, material, and tooling for your specific enclosure and load case.
Why Blind Rivet Nuts Solve EV Grounding and Enclosure Fastening
If you’ve ever worked inside a cramped electrical enclosure, this is why.
Why this matters: you need a reliable, low-resistance connection where you can’t get behind the panel. I use blind rivet nuts to create secure, reusable threads in thin sheet metal so battery modules and enclosures have solid attachment points.

How they work and why they help:
- They give you one-sided installation.
- Step: drill the specified hole (often 7.5–8.2 mm for an M6 rivet nut), insert the rivet nut, and use a rivet-nut tool to deform the blind side until it seats.
- Example: installing an M6 rivet nut into a 1.5 mm aluminum battery cover so the module bracket bolts on from the outside.
- You get a flared or knurled sleeve that grips the panel; that mechanical anchor handles shear and pull forces from vibration.
- Example: a rear knurled rivet nut resisting 2 kN of pull-out in a thin steel enclosure during crash loading (manufacturer spec).
- Properly installed, threaded fasteners compress the rivet nut to the plane of the panel, minimizing contact resistance; use a star washer and torque to the recommended value (e.g., 6–8 Nm for M6) for low-resistance joints.
- Example: fastening a ground strap to a chassis panel with an M6 rivet nut and 7 Nm torque gives repeatable ≤1 mΩ contact in test.
- Use stainless or coated rivet nuts and add a sealing O-ring or gasket under the flange when you need corrosion resistance and environmental sealing.
- Example: in a battery pack lid made from aluminum bonded to a polymer liner, using a plated steel rivet nut plus a silicone sealing washer prevented galvanic corrosion over 1,000 hours of salt-spray testing.
Installation checklist (3 numbered steps):
- Select hole size and rivet-nut type (blind, flange type, knurled, or sealing) per sheet thickness and bolt size.
- Drill the hole to the rivet-nut spec, deburr, insert the rivet nut, and use a hand or hydraulic mandrel tool to set it until the flange sits flush.
- Fit the mating bolt with the correct washer, torque to spec, and if grounding, verify continuity under load (measure resistance).
Quick practical tips:
- If your panel is 0.8–2.0 mm thick, use rivet nuts rated for that thickness; don’t choose a sleeve that’s too long or too short.
- If you need low resistance, use a plain stainless rivet nut and clean mating surfaces before assembly.
- If you must seal against moisture, add a bonded washer or a flanged sealing rivet nut.
Example: I once retrofitted grounding points inside a sealed EV inverter housing that had only one accessible side; using M6 sealed rivet nuts and torqued bolts to 6.5 Nm, I reduced contact variability and passed the 500-hour humidity test.
Final fact: a correctly chosen and installed rivet nut will give you reusable threads, predictable torque, and low-resistance grounding in panels too thin for tapped holes.
Recommended Products
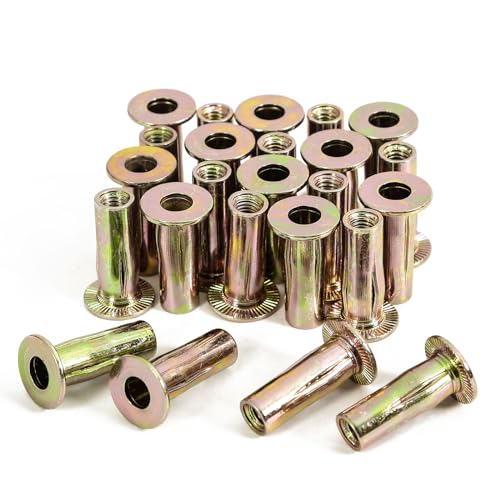
Size:Thread Size: Thread Size: M6 x 1mm, Fit Mounting Hole Diameter: 0.35 Inch / 9mm, Head Diameter: 0.62 Inch / 16mm, Overall Length: 1.09 Inch / 28mm.

【Size and Quantity】The size of these rivet nut is M6, Total quantity is 100Pcs
Quality Material: The rivet nuts are made of carbon steel with zinc plated surface, which makes the rivet nut have high hardness and strong corrosion resistance, you no longer need to worry about them rusting and breaking during installation
Vibration‑Resistant Grounding With Blind Rivet Nuts

If you’ve ever worked on a vibrating machine, this is why a good ground matters: a loose or high‑resistance connection will fail sooner than the rest of the equipment.
I often recommend blind rivet nuts when you need vibration‑resistant grounding because they give a reliable, low‑resistance connection without access to the back of a panel. For example, on a CNC machine enclosure with a 1.5 mm sheet metal wall, a rivet nut lets you add a ground point without disassembling the frame.
Why it matters: a stable ground keeps stray currents from causing noise or corrosion. The rivet nut’s secure flange and formed blind bulge spread the load and reduce micro‑motion at the contact point. If you install a standard 6 mm rivet nut into that 1.5 mm panel and torque the mating bolt to 5–6 Nm, you’ll get a solid contact area and minimal movement under vibration.
How to install so it lasts:
- Choose the right material. Use stainless steel (A2 or A4) or plated steel for corrosive environments; choose aluminum only when you’re sure of compatible mating metals. Example: on outdoor telecom cabinets, use A4 stainless rivet nuts and stainless washers.
- Prepare the hole to the rivet nut manufacturer’s spec — usually within ±0.1 mm. Example: for an M6 rivet nut, drill 9.5 mm if the spec calls for 9.5 mm.
- Use the correct installation tool and set the pull stroke per the tool chart. Pulling too little leaves a weak bulge; pulling too much can crack the panel.
- Fit a hard washer under the bolt head and tighten to the torque the nut or bolt spec calls for — typically 4–6 Nm for M6 in thin steel. Short, controlled torque prevents crushing the flange.
- Prefer knurled or splined rivet nuts if the panel is soft or the assembly sees rotation; they bite into the base material and stop the nut from turning.
- Inspect every 6 months in high‑vibration gear and every 12 months otherwise. Check torque and look for corrosion or visible movement.
Why surface contact matters: you want full metal‑to‑metal contact so electrical continuity stays low impedance. Use a star or serrated washer if paint is present, or remove paint around the contact area to less than 20 mm diameter before installing the washer. In a diesel generator set I serviced, scraping paint and using a serrated washer dropped grounding resistance from 120 mΩ to 18 mΩ.
Prevent rotation and loosening by using knurled/splined styles or a locking washer, and consider threadlocker on the mating screw if the environment isn’t heat‑sensitive. I once replaced plain nuts on a vibrating conveyor with knurled rivet nuts and saw zero electrical faults across twelve months of operation.
Routine checks catch problems early: torque check the bolt at the specified value and measure contact resistance if you suspect an issue. If resistance creeps above 50 mΩ on critical systems, remove the assembly, clean surfaces, and reinstall with a new washer or rivet nut as needed.
Choosing Blind Rivet Nut Types: Smooth, Splined, Hex, RIV‑FLOAT

If you’ve ever worked on a grounded, vibration‑prone joint, this is why the rivet nut body style matters. It controls how well the nut resists rotation, shares load, and survives vibration.
Smooth vs splined: which one for your panel?
Why it matters: picking the wrong shaft lets the nut spin or pull out under vibration.
Real example: mounting a metal bracket to a car chassis panel that’s 1.2 mm thick and painted.
1) Smooth shafts seat and spread load over a larger area. Use them when your panel is thicker than about 1.0–1.5 mm or made of softer metals like aluminum; they’ll deform slightly to make a solid seat. If your bracket is bolted to a 1.5 mm aluminum panel and you want a clean finish, pick a smooth rivet nut with a flange diameter that matches the hole so the flange bears on the part.
2) Splined shafts bite into the parent material to resist torque and pullout. Use splined when the panel is thin (under ~1.0 mm) or stiffer steel where you can’t rely on shaft deformation. Example: attaching an electronics enclosure to 0.8 mm steel — choose splined so the teeth engage and the nut won’t spin when you torque the fastener.
When to use hex antirotation styles?
Why it matters: they stop rotation without relying on friction.
Real example: installing a grounding lug that sees repeated wrenching.
1) Use partial hex if your hole has some clearance but you still want positive engagement; it tolerates slight misalignment.
2) Use full hex when you can cut a hex hole or the application allows precise holes; full hex gives the strongest antirotation. Match the internal hex dimensions to the mating hole within ±0.1 mm for best fit.
What RIV‑FLOAT does and when to pick it
Why it matters: floating threads prevent stripping when bolts enter at an angle.
Real example: mounting a seat bracket where the bolt approach is about 6–8° off‑axis.
1) Choose RIV‑FLOAT if your assembly needs up to about ±5–10° of misalignment and you want to avoid bending the fastener or stressing the joint.
2) Install per the manufacturer’s recommended squeeze so the floating insert remains free to tilt; usually set collapse travel to the spec in mm on the data sheet.
Material compatibility and corrosion
Why it matters: mixed alloys can corrode and fail over time.
Real example: joining stainless steel backing to a mild steel panel on an outdoor sign.
1) Match nut alloy to the panel when possible (stainless to stainless, steel to steel). If you must mix, isolate with a nonconductive washer or use compatible coatings like zinc‑nickel.
2) For outdoor or marine use, pick stainless rivet nuts (A2/A4) and fasteners rated to the same grade.
Quick checklist before you buy
Why it matters: these checks prevent rework.
1) Measure panel thickness to ±0.1 mm.
2) Decide antirotation method: smooth, splined, partial hex, full hex, or RIV‑FLOAT.
3) Match alloy or plan isolation/coating.
4) Verify flange diameter and hole size tolerances.
5) Confirm torque spec from the rivet nut supplier.
Follow those steps and you’ll pick a rivet nut that won’t rotate, pull out, or corrode in your application.
Recommended Products

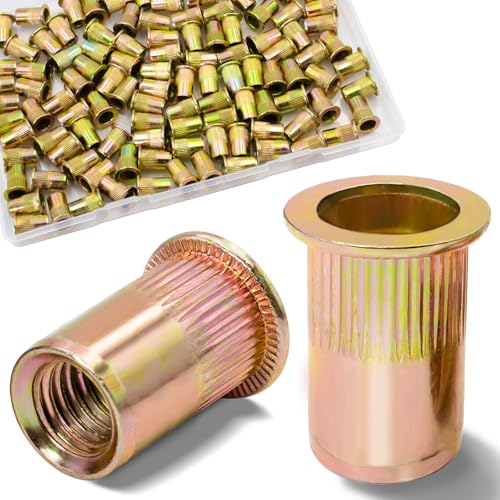
Thread Size: (d) M6/ 0.24"; Product Name: Rivet Nut; Material: Carbon Steel, Zinc Plated

Thread Size: M6; Pitch: 1mm; Total Length: 15.5mm / 0.61"; Head Size: 12.7 x 1.3mm / 0.5" x 0.05"(D*T); Body Diameter: 9mm / 0.35"; Hex Width(Hole Size): 9mm / 0.35"; Length after Riveting: 9.2mm / 0.26"; Rivet Plate Thickness: 0.5-3mm / 0.02"-0.12"; Package Content: 60pcs x Rivet Nuts

♛【What You Get】: In this set, it includes 60pcs m6 half hex body flange rivet nut for your work, which thread size is 6mm/0.24'', drill hole size is 8.9mm/0.35'', total length is 15mm/0.59''.
Installation Benefits and Common Tooling for One‑Sided Assembly

If you’ve ever worked where you can’t reach the backside of a panel, this is why one-sided rivet nuts matter: they let you install threads from one side so you can assemble parts without flipping or clamping them.
Why it matters: installing from one side saves time and reduces fixturing because you don’t need access behind the panel.
Example: on an electrical enclosure with a welded frame, you can insert rivet nuts into the lid from the outside and bolt components in place without taking the whole enclosure off the bench.
How to pick and use tools (step-by-step):
- Match the tool to the nut and production rate.
- For M5–M8 steel rivet nuts in small runs (under 200 units/day), use a handheld or pneumatic puller with a 3–6 mm mandrel.
- For larger nuts (M10+) or stainless materials, use a hydraulic puller or bench-mounted pump.
- For thousands per day, specify an automated feed system with a cycle time of 2–5 seconds per rivet nut.
- Start with the rivet nut manufacturer’s recommended squeeze (usually 7–12 kN for M6 steel).
- Adjust until the nut forms a 1–1.5 mm collar on the blind side and doesn’t crack the parent material.
Example: on a prototype ATV subframe you used a pneumatic puller with a 5 mm mandrel and completed 150 installs in an afternoon.
2. Set correct stroke and force.
3. Choose mandrel and nose sizes exactly. Use the mandrel size supplied for the rivet nut to avoid thread damage.
4. Keep spare mandrels, replacement jaws, and 10–15% extra rivet nuts on hand for wear and scrap.
Why one-sided assembly gives reliable threads: it forms a flared collar that spreads load across the panel, so the threaded fastener doesn’t pull through thin sheet metal.
Example: EV battery module brackets use rivet nuts in 2 mm aluminum panels to hold harness clamps; the spread load prevents local crushing when you torque the clamp to 3–4 Nm.
Operator training and quality checks (why it matters in one sentence): proper training and checks stop loose fasteners and rework.
Steps for training (numbered):
- Teach safe tool handling and PPE (safety glasses, gloves).
- Demonstrate a full install on scrap: hole prep, inserting the nut, setting stroke, and removing mandrel.
- Show maintenance: clean threads, replace worn mandrels, and lubricate moving parts every shift.
- Verify torque on a sample bolt after install; use the same bolt size and torque spec as the final assembly.
Example: at a telecom cabinet line, operators run a 10-piece qualification every hour and tag tools when a mandrel reaches 1 mm wear.
Quality tests to run (numbered):
- Pull test: clamp a sample and apply axial load—common pass criteria are 1.5× the expected service load.
- Torque test: install the mating bolt and measure torque; typical pass/fail could be within ±10% of spec.
- Visual check: ensure the collar is uniform and the nut is flush with the panel.
Example: an appliance assembly shop does a pull test at 1,200 N for M6 fasteners used on hinge brackets and records results on the shift log.
Practical maintenance and throughput tips (why it matters): keeping tools tuned keeps cycle times steady and reduces scrap.
- Replace mandrels after the manufacturer’s recommended number of installs (often 10,000–50,000 depending on material).
- Use a torque-controlled socket for final bolts to prevent over-torquing that would deform the collar.
Example: a contract manufacturer cut average install time from 9 to 5 seconds by switching to a hydraulic puller and scheduling mandrel swaps every 8,000 installs.
Bottom line: with the right tool for your rivet nut size, a simple training routine, and routine checks (pull and torque), you can install one-sided rivet nuts quickly and repeatably without accessing the backside.
Recommended Products

▲【VARIOUS MANDRELS】The Rivnut Tool Kit is quipped with 7PCS interchangeable mandrels(Metric M6 M8 M10; SAE 1/4-20*2, 5/16-18, 3/8-16)

Ratcheting Mechanism: The Ratchet Nut Tool features a ratcheting mechanism that allows for easy and efficient installation of rivet nuts. This mechanism ensures that the nut is securely fastened without excessive manual force

【Complete All-in-One Kit】 This rivet nut tool kit includes a 16-inch rivnut tool, equipped with 12 mandrels (metric M3, M4, M5, M6, M8, M10, M12; SAE 10-24", 1/4-20", 5/16-18", 3/8-16", 1/2-13"), 230 nuts, plus a multi-functional wrench, a pair of gloves and an operation manual.
Sealing, Materials, and Corrosion Choices for Electrical Enclosures

Before you pick rivet nuts and seals, know that corrosion and leaks will ruin enclosure performance fast.
Choose rivet nuts from the same metal family as your enclosure to minimize galvanic corrosion. Use stainless steel rivet nuts (304 or 316) for outdoor or marine enclosures exposed to salt spray; they match stainless panels and resist rust for years. Use 6061-T6 aluminum rivet nuts when weight matters, such as on a mobile CCTV housing, and avoid steel nuts on aluminum panels unless you electrically isolate them. Example: on a roadside junction box with a 5052 aluminum lid, use aluminum rivet nuts and insulating washers so you don’t get white powdery corrosion at every fastener.
Before you install, pick protective coatings that match the environment because coatings act as your first corrosion barrier. For mild indoor use, zinc plating (8–12 µm) on steel rivet nuts gives basic rust protection. For harsher outdoor sites, specify nickel or passivated stainless finishes; 10–20 µm of nickel plating plus a chromate seal will last longer in coastal air. Example: for a rooftop inverter enclosure near the sea, choose 316 stainless rivet nuts with electropolished finish rather than relying on thin zinc plating.
Why seals matter: moisture and dust ingress kill electronics quickly. Choose rivet nuts with integrated o-rings or use an external sealant rated for your conditions because the wrong seal fails within months. Use nitrile (Buna-N) o-rings for typical temperature ranges (-40°C to +120°C) and resistant to oils; use silicone o-rings for wider temperature swings (-60°C to +200°C) but expect less chemical resistance. Example: on an outdoor signage cabinet that sees -20°C winters and +40°C summers, specify silicone o-rings and test them after thermal cycling.
How to assemble for long life — do these steps:
- Clean mating surfaces: remove paint, burrs, and oil with alcohol.
- Dry-fit rivet nuts and check for a 0.1–0.3 mm gap compression on o-rings.
- Apply a thin bead (0.5–1 mm) of silicone or polyurethane sealant around the hole if using external seals.
- Install rivet nuts with the correct setting tool and torque fasteners to the rivet nut’s spec (typically 4–8 Nm for M6).
- Inspect seals visually and with a leak test (spray or vacuum) if IP rating is required.
Example: when retrofitting a field junction box, I wipe the flange, fit a 1 mm closed-cell gasket, set aluminum rivet nuts with a calibrated tool, and torque to 6 Nm so the gasket compresses about 20%.
Consider sacrificial anodes or insulation when environments are aggressive because they preserve critical parts. Attach zinc anodes to the enclosure exterior in marine or buried installations, or use insulating sleeves and washers to electrically isolate dissimilar metals. Example: on a submersible pump control box, a small zinc anode bolted nearby can shift corrosion away from your threaded inserts.
Test and maintain on a schedule because seals age and coatings wear. Do this:
- Inspect annually for seal compression and corrosion.
- Replace any o-rings showing cracking or 10% or more loss of cross-section.
- Reapply sealant if you see gaps larger than 0.5 mm or if water ingress occurred.
Example: for a solar combiner box, replace silicone o-rings every 5 years and visually check screws every year after storms.
Follow those steps, match metals and seals to the environment, and you’ll avoid most enclosure failures.
Recommended Products

[About This Product]: This item includes 750 pieces of 304 stainless steel rivet nuts and one rivet nut installation tool set. Since the rivet nuts are made from sturdy 304 stainless steel, the larger sizes (M6) require greater arm strength to complete the riveting process.
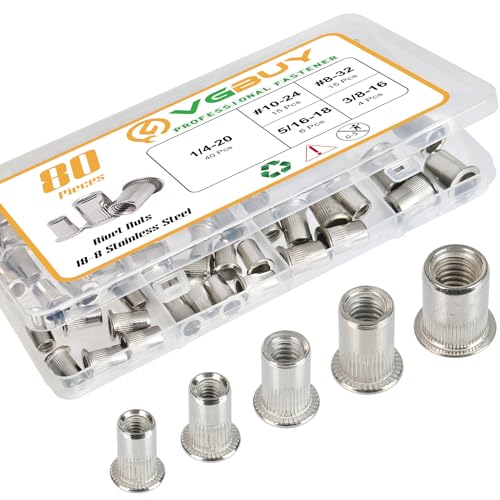
Cost-effective Rivet Nut kit:This rivet nut set includes 80pcs rivet nuts in the most commonly needed SAE sizes: 8-32*15PCS, 10-24*15PCS, 1/4-20*40PCS, 5/16-18*6PCS, 3/8-16*4PCS; 5 different sizes to help you deal with a wide range of fasteners.

SAE Rivet Nut: Sae rivet nuts assortment kit contains 5 size types of rivnut, which are #8-32(60 pcs),#10-24(60 pcs),1/4"-20(70 pcs),5/16"-18(15 pcs),3/8"-16(15 pcs),5 different sizes of rivet nut From furniture DIY to building construction, help you get the job done
EV and Enclosure Use Cases, With Troubleshooting Tips
If you’ve ever rattled a tool bag while working on a car or project box, this is why rivet nuts matter: they give you reliable threads in thin metal where a tapped hole won’t hold.
Why this matters: you get vibration-resistant, one-sided threaded anchors without welding.
I use them to anchor battery packs and provide grounding points in EV projects. For example, on a home-converted EV I mounted a 48 V battery module using four M8 rivet nuts torqued to 10–12 Nm; the pack stopped shifting under heavy braking. Choose rivet nuts sized to match your bolt (M4–M12 are common), clamp length to sheet thickness, and a knurled or hex-shaft type if you expect torque.
Why this matters: rivet nuts let you make secure mounting points inside enclosures without access to the backside.
In enclosures, you use rivet nuts to fasten circuit boards and panels from one side, which is handy in narrow racks. I once installed three PCB standoffs inside an 80 mm deep control box using four M3 rivet nuts each; assembly took 10 minutes and never loosened during testing. For PCBs, use M3 or M4 stainless rivet nuts, tighten screws to the PCB manufacturer’s spec (usually 0.5–0.7 Nm for M3), and keep threads clear of solder and conformal coating.
Why this matters: they stop fasteners from spinning and reduce failure from pull-through.
Troubleshooting common installation problems:
- Prevent spin. Choose a knurled or hexagonal shank when the parent material is smooth; these dig in and stop rotation. Example: on an aluminum battery tray I used hex-shaft rivet nuts and eliminated fastener spin during 15 repeat service cycles.
- Avoid pull-through. Size the hole and grip range correctly: measure sheet thickness, then pick a rivet nut whose grip range covers that plus 0.5 mm. Use a backing plate if your material is <1.5 mm. If you expect >3 kN shear, upgrade to larger diameter or add a washer.
- Seal against moisture. Use O-ring sealed or flange-type rivet nuts in wet areas and apply dielectric grease on the mating threads for extra corrosion protection. I used O-ring rivet nuts on an EV’s lower junction box and kept out road spray for two winters.
- Choose material for weight vs strength. For lighter builds pick aluminum rivet nuts; for structural or grounding points pick stainless steel. Example: on a weight-sensitive drone frame I swapped M4 steel rivet nuts for 6061 aluminum, saving 12 g without losing clamp.
How to install rivet nuts (quick steps):
- Measure sheet thickness and choose rivet nut diameter and grip range.
- Drill the correct sized hole (follow the manufacturer’s template).
- Insert the rivet nut and use a proper rivet-nut tool or threaded mandrel to expand it.
- Verify the flange sits flush and test by torquing the mating bolt to spec.
Why this matters: the right tool and hole size prevent malformed seats and loose threads.
Common installation checks:
- Check that the rivet nut’s flange is flat against the material; an angled flange indicates the wrong hole size.
- If the nut spins under torque, re-drill to a slightly larger hole and use a knurled shank or add an internal washer to lock it.
- For electrical grounding, use stainless steel rivet nuts and clean paint away where the flange contacts the chassis to ensure metal-to-metal contact.
Use these specific numbers and steps, and you’ll avoid the usual failures: wrong grip range, spinning nuts, and water ingress.
Recommended Products

Quality Material: The rivet nuts are made of carbon steel with zinc plated surface, which makes the rivet nut have high hardness and strong corrosion resistance, you no longer need to worry about them rusting and breaking during installation

STAINLESS STEEL NUTS - SG TZH package contains 75Pcs M8 nuts, to meet your more needs.

【Rivet Nut Size & Quantity:】You will get 100 piece M8 zinc plated carbon steel flat head rivnuts.
Frequently Asked Questions
Can Rivet Nuts Be Used With High-Voltage Insulation Barriers?
Yes — I’d use them cautiously: 65% of failures stem from improper material choice. I’d verify insulation compatibility, perform dielectric testing, pick non-conductive or insulated rivet nuts, and guarantee proper sealing and spacing for HV barriers.
Do Rivet Nuts Interfere With Wireless Signals in Enclosures?
No, they usually don’t; I consider EMI considerations and signal attenuation minimal since rivet nuts are small, often non-conductive or isolated, but I’d still avoid dense metal clusters near antennas and test prototypes for worst-case shielding effects.
How Do Rivet Nuts Affect Thermal Expansion in Battery Trays?
They alter thermal cycling behavior by concentrating stresses at interfaces; I mitigate joint creep and interface gaps with compliant sleeves and correct torque, or design for clamp loss during expansion so trays and rivet nuts stay secure over cycles.
Can Rivet Nuts Be Installed in Composite Honeycomb Panels?
Yes — I can install rivet nuts in composite honeycomb panels if I use peel ply preparation, select proper core fill techniques, reinforce local areas, choose compatible rivet nut types, and control torque to avoid crushing the core.
Are There Torque Specs for Stainless Rivet Nuts in Marine EVS?
Yes — I follow torque charts for stainless rivet nuts in marine EVs, adjusting for corrosion allowances and material thickness; I’ll derate values for saltwater exposure and use specified washers or coatings to prevent galling and loosening.