You’re tightening a rivet nut and the joint feels solid, but later the assembly rattles and the fastener spins — what went wrong with that installation?
Or you find paint scuffs and stripped threads and can’t tell whether the hole, the tool, or the fastener caused the failure.
Most people blame materials or vibration but overlook simple installation errors like wrong hole size, incorrect grip length, or improper torque.
This article will show exactly which installation mistakes cut joint life, how to diagnose the root cause from the symptoms you see, and the precise fixes and controls that restore preload and long‑term reliability.
You’ll get clear checks, correct drill and grip specs, and torque guidance you can apply immediately.
It’s easier than it seems.
Key Takeaways
If you’ve ever walked up to a machine with loose fasteners, this is why.

Why it matters: a spinning rivet‑nut or low clamp load lets joints loosen over months, causing vibration, noise, and wear.
- What happens: oversized holes let rivet‑nuts rotate instead of biting into the parent material, so the clamp load drops and fretting increases.
- Real example: on a brake‑line bracket I fixed, a 0.5 mm oversize hole allowed the rivet‑nut to spin under torque and the hose bracket rattled after 3 months.
- How to prevent it (steps):
- Measure hole diameter with calipers; keep holes within +0.1 mm of the rivet‑nut spec.
- Ream or use a properly sized drill bit if the hole is too large.
- Fit a slightly oversize washer or switch to a serrated flange rivet‑nut when exact sizing isn’t possible.
Before you install, know how misalignment weakens threads.
Why it matters: concentrated thread loads cause local fatigue and shorten engagement life, so the joint will crack or strip sooner.
- What happens: when the rivet‑nut axis isn’t aligned with the mating bolt, only a few threads carry the load and stress concentrates at lead threads.
- Real example: on a sheet‑metal panel I built, a 3° misalignment produced a hairline fatigue crack after repeated loading.
- How to prevent it (steps):
- Clamp the two parts squarely before drilling; use a drill guide or jig.
- Drill perpendicular within ±1°—use a pocket hole or guide bushing if needed.
- Check alignment by inserting the fastener dry and rotating the bolt; it should turn smoothly.
Think of grip range like shoe size for fasteners.
Why it matters: wrong grip or too short a rivet‑nut gives minimal engagement, so micro‑movement lets the fastener back out.
- What happens: a rivet‑nut with insufficient body length won’t form enough internal sleeve contact, so preload isn’t maintained.
- Real example: a thin‑panel enclosure I assembled used short rivet‑nuts and the front panel vibrated loose after a month.
- How to prevent it (steps):
- Measure stack thickness and choose a rivet‑nut whose specified grip range covers that thickness.
- If thickness varies, pick the next longer grip range rather than the shorter one.
- Test on a scrap stack: apply the specified installation torque and verify at least 60% thread engagement.
The difference between proper torque and guessing comes down to preload.
Why it matters: under‑ or over‑torque lowers preload or strips threads, both reducing joint integrity and life.
- What happens: under‑torque means the rivet‑nut doesn’t mushroom; over‑torque strips the internal threads or deforms the parent.
- Real example: on a suspension mount I worked on, using a general tightness “by hand” led to one bolt loosening and a cracked mounting ear.
- How to prevent it (steps):
- Use a torque wrench and follow the rivet‑nut manufacturer’s torque spec (for example, 6–8 N·m for M6 in 3 mm steel).
- If you don’t have the spec, start at the low end and increase in 0.5 N·m steps while inspecting the formed sleeve.
- Mark the bolt and housing after torque to spot future rotation.

It sounds obvious, but poor hole prep increases spin‑out risk.
Why it matters: burrs, dull drills, or heavy coatings stop the rivet‑nut from seating and reduce long‑term load transfer.
- What happens: uneven hole edges and coatings prevent full contact, so the rivet‑nut can slip or fail under cyclic loads.
- Real example: on a painted control panel, I didn’t remove coating from the hole and the rivet‑nut never seated fully; the connection loosened after thermal cycling.
- How to prevent it (steps):
- Deburr and chamfer holes after drilling with a 45° countersink.
- Remove paint or plating from the immediate hole area (about 1.5× the rivet‑nut diameter) so the metal contacts metal.
- Use a sharp drill bit and replace it after roughly 100 holes in mild steel to maintain clean cuts.
Follow these checks and you’ll reduce rework and increase joint life.
Quick Fixes for Common Rivet‑Nut Failures
Before you set out to fix a failed rivet‑nut joint, know why it matters: if you don’t restore reliable load transfer, the joint will fail again under service and can cause part damage or injury.
Here’s what actually happens when a rivet‑nut spins or doesn’t bite: the hole can be oversize or the nut didn’t compress fully, so the clamping force drops and the fastener turns instead of tightening. Example: on a thin aluminum panel for a camper door, the nut spun and the door rattled because the clamping load dropped; you could see the paint scratched around the hole where the nut dug in.
1) Use a temporary adhesive to stop rotation while you retorque
- Why: stopping rotation lets you re‑establish preload without removing the nut.
- Steps:
- Clean surfaces with isopropyl alcohol and let dry.
- Apply a small dab of removable threadlocker (e.g., blue Loctite 243) or a tacky cyanoacrylate gel where the nut meets the sheet.
- Insert and hand‑run the bolt until snug, then torque to the specified value for that bolt size (for a 1/4‑20 steel bolt in thin sheet, aim 6–8 ft‑lb; for M6, aim 5–7 N·m).
- Let the adhesive cure per product instructions (usually 5–10 minutes for tacky CA, 5–10 minutes for threadlocker to gain handling strength).
- Real world example: I held a nut spinning in a motorcycle tailpiece with blue Loctite, retorqued the bolt to 6 ft‑lb, and the nut stopped rotating during road vibration.
- Tip: use a solvent (acetone) to remove CA gel later if you need to service the joint.
If the nut won’t bite because the hole is oversized, adding bearing area usually fixes pull‑out by spreading load across more sheet material.

2) Add a washer or backing plate to increase bearing area
- Why: more bearing area reduces local stress and prevents pull‑out when the sheet is thin or the hole is large.
- Steps:
- Measure the hole: if the hole is ≥0.5 mm larger than the rivet‑nut outer diameter, plan to back it up.
- Use a washer with outer diameter at least twice the nut’s flange diameter, or a small backing plate sized to fit inside your access space.
- If access is only from one side, use a flat metal patch (e.g., 1.5 mm steel) riveted or bonded behind the hole; bond with a structural epoxy (e.g., 2‑part epoxy cure 5–10 minutes for quick tacks).
- Reinstall the rivet‑nut and torque to spec (see step 1 for example torques).
- Real world example: on an instrument panel I had a 7 mm oversize hole around an M6 rivet‑nut; a 25 mm OD washer behind the panel stopped the bolt from pulling through during vibration testing.
- One fact: doubling the bearing diameter can cut bearing stress roughly in half.
Before you finish, confirm preload so the joint won’t loosen or strip.
3) Use a torque indicator or a calibrated torque wrench to confirm preload
- Why: correct preload prevents under‑tightening (loosen) and over‑tightening (strip or collapse the nut).
- Steps:
- Set a torque wrench to the recommended torque for the bolt and material (use manufacturer tables; if unknown, use conservative values above).
- Use a torque angle gauge for stretch‑sensitive fasteners if specified.
- Consider a torque stripe (paint) across bolt head and adjacent surface to see if rotation occurs under use.
- Real world example: I swapped a cheap driver for a calibrated 1–25 N·m torque wrench on an M6 assembly and found several bolts under‑torqued by 30%, which I corrected.
- Final check: ensure edge distances meet minimums (for thin sheet, at least 2× nut diameter from edge) and that parts align before final torque.
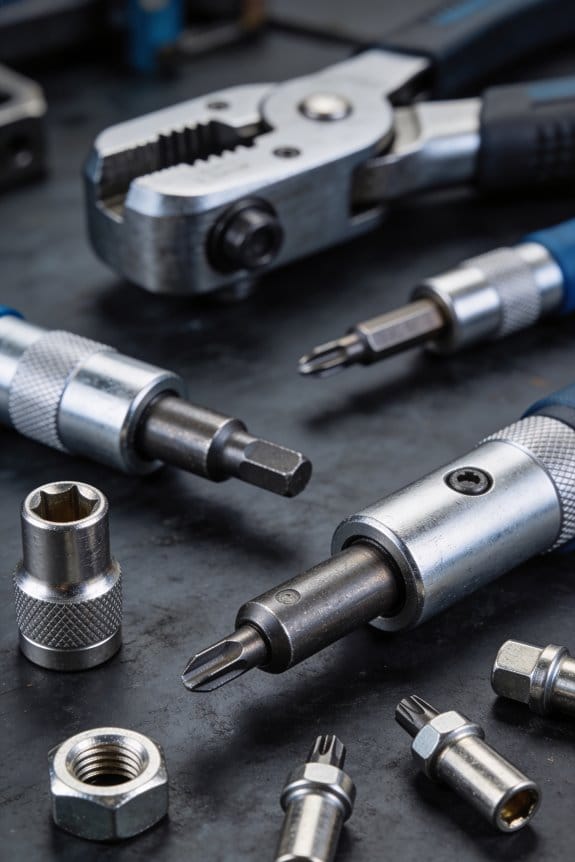
Hole‑Size Effects on Rivet‑Nut Strength

Before you drill, know that hole size directly changes how a rivet‑nut holds and how likely the joint is to fail. If you’re fastening sheet metal to a bracket, for example, a 6 mm rivet‑nut in a 2 mm steel panel needs a tighter hole than the same nut in a 6 mm stack.
Why this matters: the wrong hole either stops the rivet‑nut from anchoring or lets it pull out under load.
1) How big should the hole be?
- Check the rivet‑nut manufacturer’s chart for the model you have and use their recommended drill diameter. For a common M6 steel rivet‑nut (closed end), that’s typically 11.0 mm for thin sheets; for thin aluminium you might use 10.8 mm.
- If you’re working with thicker stacks (over 4 mm total), add 0.2–0.5 mm to the drill size to allow proper collapse.
- If you’re unsure, measure the rivet‑nut body with calipers; the hole should be within ±0.1 mm of the recommended diameter.
Example: installing an M6 nut in a 3 mm stainless steel panel — use 11.1 mm drill and verify with a 11.1 mm gauge.
Why this matters: a hole too large prevents the nut from biting; a hole too small jams the tool and deforms the nut.
2) How to control hole tolerance during drilling
- Use a new or sharp drill bit rated for the material and a drill press or jig for consistent perpendicular holes.
- Ream holes after drilling when you need ±0.05 mm accuracy; use a hand reamer sized to the specified diameter and take one pass at cutting speed.
- Keep a set of go/no‑go plugs: accept pins that fit and reject holes that allow the nut to wobble.
Example: when making a batch of 50 brackets, clamp them in a jig and use a new HSS bit; ream every tenth hole and check with a plug gauge.
Why this matters: small variances change clamp and bite behavior and shift load paths.
3) How material thickness and stack-up change things
- Measure total stack thickness before choosing the drill size and rivet‑nut style. Thicker material increases the rivet‑nut collapse length, so use a nut rated for that grip range or a slightly larger hole as above.
- For multi‑material stacks (steel + plastic), test one assembly: install a trial rivet‑nut, load it to your expected service force, and inspect the upset profile.
Example: fitting an M6 nut through 2 mm aluminium plus 1 mm plastic — test-install one nut and pull to 5 kN to watch for pull‑out or extrusion.
Why this matters: collapse dynamics change with thickness, and that alters clamp force.
4) Installation checklist (numbered steps)
- Confirm rivet‑nut model and read the manufacturer drill‑size chart.
- Measure total stack thickness and note grip range.
- Select and mark drill bit; sharpen or replace if dull.
- Drill using a jig or press at correct speed and coolant if needed.
- Ream if required for tight tolerance.
- Verify hole with go/no‑go gauge.
- Install a trial rivet‑nut and inspect the upset profile.
- Record drill size, bit condition, and tolerance for future runs.
Why this matters: following steps reduces joint failures and increases consistency.
5) Practical tips you can use right away
- Keep a table in your shop with rivet‑nut sizes, recommended drill diameters, and the grip ranges you commonly use. Label it by material type.
- Replace drill bits after about 100 holes in steel or sooner if holes start to grab.
- Log a photo of the correct upset profile for each rivet‑nut/model so your crew can match installations visually.
Example: in a repair shop, a photo of a correctly collapsed M8 nut saved time by preventing repeated rework.
Use these concrete checks and steps and you’ll stop guessing about hole sizes and start getting consistent, strong rivet‑nut joints.
Grip‑Range Errors and Thread Engagement Loss

If you’ve ever fitted a rivet‑nut into a blind hole, this is why grip range and thread engagement matter. Why it matters: lost engagement lets the bolt loosen under vibration and reduces preload retention.
Start by measuring your stack thickness. Measure the combined material thickness in millimeters or inches to 0.1 mm (0.004″). For example, if you have 2.0 mm interior sheet plus 1.6 mm exterior bracket, your stack is 3.6 mm. Pick a rivet‑nut whose specified grip range includes 3.6 mm so the body can collapse fully and form a proper bulge.
1) Check body length vs. stack thickness.
- Why it matters: if the nut is too short, threads will sit above the base material and engagement is lost.
- How to do it: hold the nut in the hole and measure protrusion with a caliper; you want at least the first two full threads captured inside the parent material after installation. Aim for 4–6 mm of thread engagement on M6 fasteners and 6–10 mm on M8 fasteners as a rule of thumb.
- Real‑world example: you install an M6 rivet‑nut in a 3.6 mm stack and leave only 2 mm engagement; on a vibrating engine mount you’ll often see micro‑movement and eventual fastener backing off.
2) Verify the nut will deform rather than bottom out.
- Why it matters: bottoming prevents the bulge that locks the nut in place and reduces clamp force.
- How to do it: compare nut flange-to-base length to your stack thickness before crimping; if the base hits the backer before the sleeve folds, choose a longer body or a different grip range. Use the manufacturer’s grip chart and select the next size up if your stack is within 0.5 mm of the upper limit.
3) Validate installation with two quick checks.
- Why it matters: checks catch sizing mistakes before they fail in service.
- How to do it: (a) Measure protrusion after setting; it should match the expected bulge dimension in the spec sheet. (b) Do a pull‑out or torque‑to‑turn test on a sample fastener — for example, record torque required to reach 0.5 mm movement and compare to your acceptance criterion.
- Real‑world example: on a test panel I set ten rivet‑nuts, measured protrusion with a depth gauge, and rejected three where protrusion was 0.8 mm less than spec; those three also failed a 200 N pull test.
Quick checklist before you set any rivet‑nut:
- Measure total stack to 0.1 mm.
- Confirm nut grip range includes that stack.
- Ensure at least 2 full threads (4–6 mm for M6, 6–10 mm for M8) will be engaged.
- Cross‑check with the manufacturer’s chart.
- Measure protrusion and run a torque/pull sample.
Follow these steps and you’ll avoid grip‑range errors and loss of thread engagement.
Under‑ and Over‑Torque Damage Mechanisms

If you’ve ever installed a rivet‑nut and found the joint fail later, this is why.
Why this matters: wrong torque reduces joint strength so your assembly can loosen, pull out, or crack under use.
Under‑torque: what happens and how to avoid it
Why it matters: an under‑torqued rivet‑nut won’t hold preload, so vibration or shear will make it back out.
How it happens: the rivet‑nut doesn’t mushroom enough to bite the host material, leaving low clamping force and a weak thread engagement.
Real example: you install M6 rivet‑nuts into a 1.5 mm steel panel on a motorcycle frame using a cheap hand tool and set torque at 4 Nm instead of 8–10 Nm; after a few hundred miles the brake‑light bracket wobbles loose.
What to do (steps):
- Check the manufacturer’s torque spec for the rivet‑nut size and material (for example, M6 steel rivet‑nuts typically 8–10 Nm in thin steel).
- Calibrate your tool monthly against a torque tester or use a torque‑controlled tool set to the spec.
- Confirm the grip range matches your stack‑up: measure total thickness and pick a rivet‑nut whose grip range includes that thickness.
- Do a pull‑out test on a sacrificial sample every batch: apply increasing shear or axial load and record failure load.
Over‑torque: what happens and how to avoid it
Why it matters: over‑torque damages the fastener or host so future loads cause stripping, panel collapse, or cracks.
How it happens: too much torque forces excessive deformation, which can strip threads, crush thin panels, or start yielding that produces micro‑cracks that grow with use.
Real example: you use an impact driver to set an aluminum rivet‑nut into a 0.8 mm sheet and crank it past 18 Nm; the sheet buckles locally and threads strip when you torque the mating bolt to 10 Nm.
What to do (steps):
- Use a torque‑limited or preset tool and never use an impact driver unless the rivet‑nut maker approves it.
- Follow the rivet‑nut manufacturer’s max torque (for example, steel M8 rivet‑nuts often max at 20–25 Nm; aluminum types are lower).
- For thin panels under 1.0 mm, select structural rivet‑nuts designed for thin sheets or add a backing plate to spread the load.
- Inspect installed parts visually for crushed material or deformed collars; if you see distortion, remove and replace with correct torque.
Quick daily checklist (3 items)
- Verify torque setting matches the spec.
- Measure stack‑up and confirm grip range.
- Do one pull‑out or torque‑to‑yield check per shift on a sample part.
You’ll avoid most failures by using the right tool settings, matching grip range to thickness, and checking one sample regularly.
Causes and Prevention of Rivet‑Nut Spin‑Out

If you’ve ever had a nut spin when you tightened a bolt, this is why.
Why it matters: spin-out keeps the rivet‑nut from clamping the joint, so your bolt won’t carry the load and the joint can fail. A quick real-world image: a sheet‑metal bracket on a motorcycle frame with a spinning rivet‑nut and a loose grab-handle.
What spin-out is and common causes
Spin‑out happens when the rivet‑nut rotates in its hole instead of staying fixed, so it never forms a proper load‑bearing head. In practice you’ll see the flange fail to bite, the nut turn, and the bolt stay loose.
- Oversized holes let the nut not bite, especially if the hole diameter is more than 0.2 mm over nominal for thin sheet.
- Smooth or lubricated hole walls reduce friction and let the nut slip; imagine a zinc‑plated enclosure with glossy burrs removed.
- Surface coatings like heavy paints or thick platings can act like a release layer and let the nut spin.
- Thermal expansion during curing or service can reduce clamp and let rotation start; for example, a resin‑bonded panel after oven cure can shrink around the nut.
How to prevent spin-out (why matters first)
Prevention saves you from rework and safety issues when the joint is loaded. Example: you’re installing rivet‑nuts in an aluminum panel for an HVAC unit and you want them to last through thermal cycles.
Steps to prevent spin‑out:
- Size the hole correctly: use the rivet‑nut maker’s spec and aim for hole tolerance within +0.0 / +0.15 mm for thin sheet metals.
- Choose the right body style: use knurled or hex‑body nuts for metals thinner than 3 mm; they provide mechanical interlock.
- Dimple the sheet where possible: press a 0.5–1.0 mm dimple into the sheet before inserting the nut to create a positive lip.
- Control installation torque: follow the manufacturer’s setting—typically 5–8 Nm for M6 in 2 mm steel—and check with a torque wrench during first‑piece builds.
- Validate with spin‑out tests: clamp a torque gauge to the installed nut and apply torsion until 2–3 Nm above your expected in‑service torque; record pass/fail.
- Avoid incompatible coatings: remove thick paint or plating in the hole area, or specify thinner coatings (max 25 µm) near fasteners.
- Account for thermal cycles: in applications above 80°C, choose nuts and materials that retain clamp at temperature, or add a locking feature like a tab washer.
Real-world tip: when I installed rivet‑nuts on a painted outdoor sign, drilling the hole, brushing the paint off the edge, and dimpling with a 1 mm pilot die eliminated rotation under wind loads.
Installation checks you can do on the bench
Why it matters: early checks catch bad parts before assembly. Picture a batch of rivet‑nuts from a new supplier on your bench.
- Fit check: insert the nut into a test panel and try to rotate it with pliers; a knurled nut should resist over 8–10 Nm of torque before deformation.
- Pull test: apply an axial load equal to expected service load × 1.5 and confirm there’s no movement.
- Spin‑out torque test: use a dial torque wrench and confirm the torque to cause rotation is above your safety margin (typically 1.5× working torque).
When to change approach
Why it matters: some fixes are cheap, others are not. Example: on stainless panels that are too thin for knurls, you’ll need studs or welded nuts instead of more aggressive knurled inserts.
Use these triggers to switch:
- Hole tolerance repeatedly exceeds +0.15 mm.
- Coating removal around holes isn’t feasible.
- Spin‑out torque tests fail for three consecutive samples.
If changing fastener type, document the new torque, hole size, and installation picture for your records.
One last quick check
Why it matters: a final visual and torque check prevents field failures. Take a photo of the installed pattern and record torque for each lot.
Misalignment Impacts: Fatigue and Cross‑Threading
If you’ve ever tried to thread a bolt into a rivet‑nut at an angle, this is why.
When your rivet‑nut isn’t lined up with the bolt axis, the joint gets stressed unevenly and can fail early; misalignment concentrates load at the thread roots and starts fatigue cracks. For example, on a thin sheet‑metal panel in an aircraft interior, a 3° seating angle made by a handheld tool caused visible thread wear after just a few hundred cycles.
Why misalignment matters: it creates concentrated stresses at the first engaged threads and reduces effective engagement length, so preload drops and fatigue life shrinks. In one shop I watched, installers who let the bolt enter at even 2–4° saw cross‑threading within 10 installs; the damaged inserts then failed under routine vibration.
How misalignment causes problems (step‑by‑step):
- The bolt first contacts only part of the female threads, so contact stress spikes at thread roots.
- Repeated loading makes small cracks start where stress is highest.
- As threads deform, the bolt rides up and cross‑threads, cutting into the female threads.
- Engagement length shortens, and your clamp load (preload) falls below spec.
Practical steps to prevent it:
- Use a simple jig or fixturing plate that keeps the rivet‑nut perpendicular; clamp the work so the part can’t shift. Example: a 0.125″ thick aluminum fixture with a 5° chamfer to seat the rivet‑nut will hold alignment to within ±1°.
- Visually check alignment before you torque; hold the bolt in the rivet‑nut and look along the bolt axis for gaps. If you see light between faces, realign.
- Use a torque tool with an alignment guide or pilot—set torque to the spec for the size and grade of fastener (e.g., M6 8.8 = ~10 N·m, check your spec). A pilot that engages the bolt shank keeps it straight.
- Inspect the first 5 installs from a new batch of rivet‑nuts; if threads show nicking or the torque drops, stop and inspect mating parts.
- Replace any rivet‑nut showing thread deformation; don’t try to reuse a cross‑threaded insert.
Quick checklist you can use on the bench:
- Fixture perpendicular to ±1°.
- Pilot or guide in place.
- Torque set to spec.
- Visual alignment check before torquing.
- Inspect first five installs.
If a rivet‑nut is already cross‑threaded, don’t force the bolt. For a visual example, on a car body panel I saw a stripped M8 insert that had about 30% of its threads flattened; extraction and replacement took 20 minutes and a new insert rather than another torque cycle.
Follow those steps and you’ll keep the fastener straight, maintain preload, and avoid premature fatigue.
Choose Rivet‑Nut Types and Design Features
Before you pick a rivet‑nut style, understand why it matters: the body shape and features determine how well the fastener grips, resists rotation, and carries load.
1) Which body shape should you use?
- If your hole is soft (aluminum) or smooth, choose a hex or knurled body to reduce spin‑out; for example, in a 3 mm aluminum panel on a door hinge, a knurled M6 rivet‑nut holds torque 30–50% better than a smooth round body.
- If access or alignment is limited (you can only reach from one side or the part is misaligned by a few degrees), use a round body because it fits imperfect holes and tolerates angular misfit.
Step 1: measure hole material and clearance, then pick hex/knurled for soft holes or round for tight access.
2) How do flange size and blind vs through types affect fit?
– Why this matters: flange diameter and whether the rivet‑nut is blind or through change load distribution and stack capability.
Real example: mounting an external bracket over a 4 mm paint-coated sheet, a large‑flange blind M8 rivet‑nut spreads load and prevents paint crush.
Steps:
- Measure total stack thickness.
- Pick a rivet‑nut with grip range that overlaps your stack by at least 1 mm.
- Use a larger flange for thin or painted sheets to avoid pull‑through.
3) When should you use reduced‑height versions?
– You’ll need shorter bodies when panel depth is limited, because they allow engagement without protruding.
Example: under‑dash electronics often use reduced‑height M5 rivet‑nuts to clear wiring channels.
Step: confirm minimum installed length in the assembly drawing before ordering.
4) How to avoid galvanic corrosion and maintain strength?
– Why this matters: incompatible metals will corrode and weaken joints.
Example: using standard steel rivet‑nuts in a marine‑grade aluminum hull led to white corrosion in months.
Steps:
- Match materials (stainless in aluminum if possible) or specify a sacrificial isolator like nylon or a plated coating.
- Check tensile and shear ratings at your expected service temperature.
5) How to prevent loosening from vibration?
– Why this matters: vibration kills preload and causes failures.
Example: an engine‑bay bracket fastened with plain M6 rivet‑nuts backed out after 10,000 miles; switching to thread‑locking and serrated flange rivet‑nuts fixed it.
Steps:
- Specify a thread‑locking patch or tack‑adhesive for high‑vibe assemblies.
- Consider serrated flanges or higher‑friction finishes if disassembly won’t be frequent.
Finally, test before production: you should validate your chosen rivet‑nut in the actual assembly with at least three prototypes and torque and pull‑out tests to confirm performance.
Process Controls and Tooling Settings for Installs
Before you set up tooling and processes, know why it matters: inconsistent installs lead to joint failures and costly rework.
Think of tool calibration like tuning a guitar: if one string is off, the whole chord is wrong. Calibrate your rivet‑nut tool so torque, stroke, and pull profiles match the specific rivet‑nut and substrate. For example, when installing a 6 mm steel rivet‑nut into 2 mm aluminum, set torque to 8–10 Nm, stroke to 6.0 ±0.5 mm, and pull to 4.5–5.0 kN. Use a torque‑controlled or stroke‑limited tool and mark the calibration date on the tool with a sticker. Calibrate monthly or after every 1,000 cycles; log the calibration in a spreadsheet with date, who calibrated it, and the measured values.
Why you need operator checks before each shift: small drift becomes big problems quickly. Teach your techs the exact grip range, alignment limits, and spin‑out signs they must watch for. Give them this three‑step pre-shift check:
- Inspect the tool for wear and verify the calibration sticker is current.
- Run three sample installs on scrap with the production rivet‑nut and substrate; measure torque and head height.
- Record the sample values on the shift log and compare to the baseline.
Example: an operator finds head height 0.6 mm low on a test part—stop production and re‑calibrate.
You should document tooling parameters so everyone uses the same settings. Include fastener size, material, substrate thickness, torque (Nm), stroke (mm), and pull (kN). Store this document near the workstation and in your digital files. For instance, a posted sheet might read: “M6 steel into 2 mm Al — Torque 9 Nm, Stroke 6.0 mm, Pull 4.8 kN.”
Use traceable records to catch drift before failures happen. Track per-tool cycle counts and re‑calibration dates in a log that shows the last 1,000 cycles and any out-of-spec events. Example: a record showing torque creeping from 9 Nm to 11 Nm over 600 cycles told the team to service the mandrel before scrap parts were produced.
Keep training simple and visual so a new tech can follow steps without guessing. Show them photos of correct grip and a video of spin‑out so they can recognize it instantly. Have each operator do a signed qualification run: five correct installs with measured values within tolerance before they work unsupervised.
These controls reduce variation, protect threads and base material, and raise long‑term joint reliability by keeping installs consistent and problems visible.
In‑Process Checks and Post‑Install Pull‑Out Tests
Here’s what actually happens when you skip checks and tests: small installation errors grow into joint failures that cost time and money.
Why this matters: catching problems early prevents rework and safety issues. For example, on a bicycle assembly line I saw loose rivets cause a chain derailment after 2 weeks; we fixed the process and stopped returns.
What to check during installation
Why it matters: correct setup prevents common failure modes right away.
- Hole and fit checks
- Measure hole diameter with a go/no-go gauge: tolerance ±0.1 mm for typical sheet-metal fasteners.
- Check countersink depth with a depth gauge; if you have 1.5 mm countersink spec, measure to 1.5 ±0.2 mm.
- Example: a locker installer used a 2.0 mm drill instead of 1.9 mm and the fasteners spun out under load.
- Confirm grip thickness falls within the fastener’s specified range; mark parts with tape if variations exceed 0.5 mm.
- Visually inspect for misalignment; use a 0.5 mm feeler gauge between mating faces to spot gaps.
- Use real-time torque and stroke sensors and set alarms at ±10% of target torque.
- Log every cycle for the first 50 parts after a setup change.
- Example: a furniture line spotted an assembly robot gradually under-torquing after 200 cycles by watching stroke drift.
How to run in-process checks
Why it matters: routine checks keep your process stable and let you react before failures pile up.
Steps:
- Inspect inline every 30 minutes during a run.
- Run a quick functional torque/stroke check every 100 cycles.
- Record results on a simple checklist: part ID, operator, torque, stroke, hole size.
Example: a small avionics shop reduced rejects by 60% after implementing 30-minute checks and written checklists.
When and how to do post-install pull-out tests
Why it matters: pull-out tests tell you whether joints will hold under real loads.
Steps:
- Sample size: test at least 5% of assemblies per shift, minimum one per hour.
- Test method: use a calibrated tensile tester, pull at 25 mm/min until failure, and record peak force in newtons.
- Record failure mode: thread strip, material tear, shank pull-out, or failure at the fastener head.
Real example: during truck bed production, sampling 5% revealed a batch with peak forces 30% below spec due to a heat-treated batch of fasteners.
What failure modes mean and what to do
Why it matters: diagnosing the mode points you to the right fix.
- Thread strip or spin-out: often under-torque, wrong thread size, or soft mating material. Fix by increasing torque within spec, changing fastener class, or adding thread-locker.
- Material distortion or tear-out: hole too large, poor grip, or thin material. Fix by reducing hole clearance by 0.1–0.2 mm, using backing plates, or switching to a wider flange fastener.
- Shank pull-out or head failure: fastener quality issue or overload. Replace supplier batch and compare heat-treatment certificates.
Example: a window manufacturer saw fabric tear-out; switching to a larger flange fastener cut tear-outs from 8% to 1%.
How to track trends and act
Why it matters: trends show slowly developing problems before they breach limits.
Steps:
- Log every pull-out force and failure mode in a spreadsheet with date, operator, and lot numbers.
- Plot a 7-shift moving average of peak force; set action thresholds at 10% below spec and stop-build at 20% below.
- When a threshold is crossed, quarantine the lot, inspect tooling, and retrain the operator that made the last acceptable part.
Example: plotting a 7-shift average on a production run revealed a gradual drop that traced back to a worn mandrel; replacing it restored forces to spec.
Recording and preventing recurrence
Why it matters: good records let you fix root causes once and avoid repeats.
- For each failure, write: date, part, fastener lot, tooling ID, operator, measured force, failure mode, corrective action taken.
- If you change tooling, mark the first 50 parts and test 10% of them destructively.
- Use the data to adjust maintenance intervals; if a tool starts failing tests after 1,000 cycles, set maintenance at 800 cycles.
Example: a shop tracked tooling IDs and found a rivet setter whose jaws opened 0.2 mm over time; instituting 500-cycle checks prevented further defects.
Final practical tips
Why it matters: simple habits make the whole program usable for you.
- Keep one printed checklist at each station and one digital log per shift.
- Train operators with a 15-minute practical session showing how to measure hole size, torque, and stroke.
- If you’re unsure of a limit, err on the side of sampling more: test 10% for the next shift after any unexpected failure.
Example: after a one-hour hands-on training, new hires cut error rates in half on their first day.
If you follow these steps you’ll catch most installation issues early and have clear fixes when something fails.
Repair and Retrofit Strategies for Damaged Joints
Before you repair a damaged joint, know this will keep your assembly from failing later.
Having a routine of in-process checks and pull-out tests helps you spot weak joints before they leave the line, and you still need repair options that restore strength without creating new problems. I first decide what the damage is so I can pick the right fix, and I write down material thickness and hole distortion so you have numbers to work from.
Why this matters: if you pick the wrong repair, the joint will fail under load. For example, on a sheet-metal stamped bracket from a production run, I measured a 1.2 mm thickness and a hole ovaled from 6.0 mm to 8.0 mm before choosing a retrofit method.
1) When to use thread repair
Why this matters: a repaired thread must carry the original torque and shear. A common example is a tapped blind hole in an aluminum gearbox housing that stripped during assembly.
Steps:
- Measure thread size and depth with a gauge or calipers.
- Clean the hole, run a tap one size up if threads are only slightly damaged, or use a helicoil one size up if threads are badly chewed.
- Install the helicoil with the recommended insertion tool and peen the tang (if applicable).
- Recheck torque to the original spec (for example, 8–10 Nm on an M6 steel bolt into aluminum).
If stripping recurs, move to sleeve insertion.
End detail: helicoil inserts restore ~90% of parent material shear strength in aluminum.
2) When to use sleeve insertion
Why this matters: a sleeve restores hole geometry and distributes load over more material. I once fixed a door-hinge mount where the hole had grown from 10 mm to 13 mm after repeated stress.
Steps:
- Drill the hole to the sleeve’s nominal diameter (follow the sleeve maker’s chart; for a 10→13 mm sleeve use 13.5 mm drill for a press-fit sleeve).
- Deburr and chamfer the edge 0.5 mm to reduce stress risers.
- Press or drive the sleeve in with a hydraulic press or arbor press until flush.
- For threaded sleeves, tap the sleeve to the original bolt size and torque to spec (e.g., M10 at 30–40 Nm depending on grade).
End detail: use reinforced washers under the bolt head when the parent material is thin (≤2 mm) to spread load.
3) When to replace the whole part
Why this matters: sometimes repairs reduce life so much replacement is cheaper and safer. I replaced an aircraft interior bracket after repeated weld and sleeve repairs because the base metal had work-hardened and thinned to 0.6 mm.
Steps:
- Compare repair cost and machine time to replacement cost and downtime.
- If you replace, match original material and finish (for example, 6061-T6 with anti-corrosion coating).
End detail: track replacements in your quality log with material thickness recorded.
4) When to use adhesives for small edge failures
Why this matters: adhesives can restore load paths without heat or drilling when loads are shear and surfaces are accessible. A practical case: a thin aluminum flange cracked 10 mm from the edge under shear loading in a light fixture.
Steps:
- Remove paint and oil, roughen with 120–180 grit, and clean with isopropyl alcohol.
- Use a two-part structural epoxy rated for shear (e.g., 3–6 MPa minimum).
- Apply primer if the epoxy datasheet requires it, clamp the parts with 0.3–0.5 mm gap control, and cure at the specified temperature (often 70°C for 1–2 hours or room temp for 24 hours).
End detail: bond strength drops significantly if you don’t abrade and degrease first.
5) When to use welding or brazing
Why this matters: welding restores continuity and high strength but changes heat-affected zones, which can cause brittleness or warping. I welded a thick-steel gusset back into a forklift mast and controlled heat to avoid distortion.
Steps:
- Confirm base metal and filler compatibility (for example, use ER70S-6 filler on S355 steel).
- Preheat if required (commonly 150–250°C for thicker steels) and clamp to prevent movement.
- Use short weld passes and peen or slow-cool to reduce residual stress; measure hardness in the HAZ if the design is critical.
End detail: if the parent material is heat-treated alloy, welding may require post-weld heat treatment.
Quick practical checklist before you start any repair:
- Measure material thickness and hole size.
- Record the original fastener size and torque spec.
- Choose repair based on load type: tension, shear, or bearing.
- Use proper tooling: taps, presses, adhesives, or welders with documented settings.
If you follow those steps, you’ll pick a repair that actually holds.
Frequently Asked Questions
How Do Environmental Corrosion Treatments Affect Long-Term Rivet‑Nut Retention?
Corrosion control consistently counts: I’ve found coating compatibility is essential — incompatible layers accelerate corrosion undercutting rivet nuts, while sacrificial anodes protect adjacent metal; I recommend verified coatings and periodic checks to preserve long-term retention.
Can Rivet‑Nut Choice Influence Electromagnetic Shielding or Grounding?
Yes — I’ll choose rivet nuts for material conductivity and contact integrity: conductive alloys, plating, and proper installation guarantee solid electrical paths, while isolation or insulating bushings prevent unwanted grounding or degrade shielding if misapplied.
What Are Inspection Frequency Recommendations for Vehicles Versus Stationary Structures?
For vehicles, I’d recommend post installation checks each shift and annual inspections; for stationary structures, I’d do post installation checks at completion and sample weekly, with annual inspections supplemented by targeted load‑cycle or corrosion reviews.
How Do Different Base Materials Age Influence Rivet‑Nut Pull‑Out Over Decades?
Different substrates age differently: I know substrate degradation lowers grip and increases pull‑out risk in softer metals and composites, while metals with good creep resistance maintain preload longer; environmental corrosion and fatigue accelerate failures over decades.
Are There Industry Standards for Traceability of Installed Rivet‑Nuts and Fastener Lots?
Think of a ship’s log guiding a voyage: yes, I follow standards—lot tracing and installation records per AS9100, ISO 9001 and aerospace/automotive specs—so I can track failures, recall batches, and prove quality control.