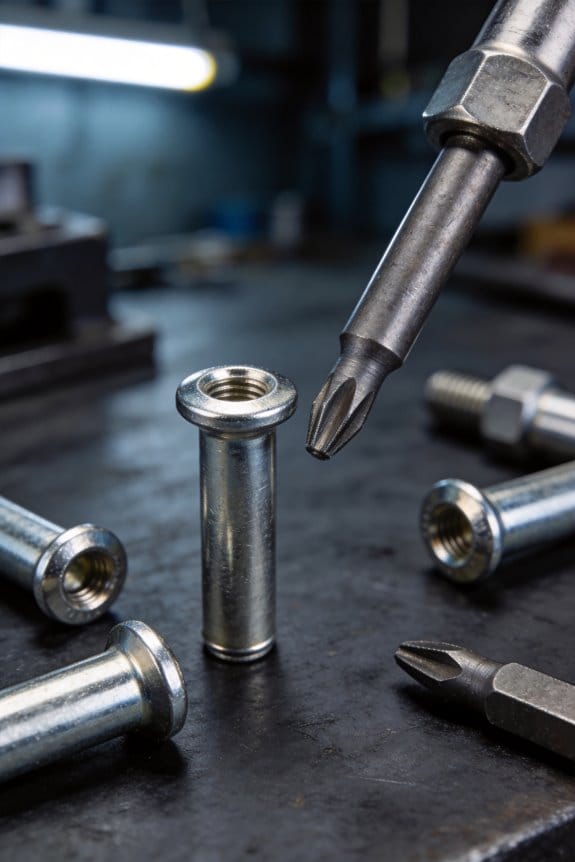
You’re staring at a thin aluminum panel with no access to the backside and wondering how to add a reliable threaded attachment point.
You’ve tried self-tapping screws and weld nuts that fail, strip, or damage the sheet.
Most people assume a simple screw or a weld will solve it, but those methods concentrate load and cause buckling in lightweight metals.
This article shows you a practical fix using rivet nuts: how they create strong, repeatable threads from one side, how their expanded sleeve spreads tensile and shear loads, and which body materials and styles to choose for corrosion, weight, and anti-rotation.
It’s easier than it looks.
Key Takeaways
If you’ve ever tried fastening into a thin metal panel with no access to the back, this is why rivet nuts help.

– They give you strong, load-bearing internal threads when you can’t reach the backside. For example, on a 1.5 mm aluminum aircraft skin where you can’t get behind the panel, installing an M6 rivet nut gives you a repeatable threaded anchor so you can bolt on brackets without crushing the sheet. Bold: internal threads.
Before I explain how to use them, know why that matters: threaded fasteners let you remove and reposition parts without weakening the panel.
– They expand on installation to spread the load over a larger area, which reduces stress concentration and prevents buckling in thin sheets. Picture attaching a luggage rack to a 0.9 mm steel van wall; a rivet nut’s flange and bulged body distribute the clamp load across several square centimeters rather than a single punched hole. Bold: spread the load.
Why you might pick a larger size is simple: you increase strength with modest weight.
– You can step up thread size (for example, use M8 instead of M6) to raise shear and pull-out capacity while only adding a few grams per anchor, which helps when you need higher load capacity without redesigning the whole structure. Real example: swapping to M8 rivet nuts on a lightweight solar array frame increased allowable bolt shear from about 3 kN to 5 kN per fastener. Bold: larger thread sizes.
If the joint sees weather or vibration, material choice matters.
– Rivet nuts come in corrosion-appropriate materials like stainless steel and aluminum so your joints resist corrosion and fatigue in different environments; use 316 stainless for marine exposure and 7075 aluminum for very low weight, but avoid mixing dissimilar metals without an insulating sleeve. Example: outdoor signage on a coastal pier used 316 stainless rivet nuts and lasted multiple seasons without loosening. Bold: corrosion-appropriate materials.

Before you install, here’s the practical part: they’re one-sided and easy to fit.
– You install rivet nuts from one side with a simple hand or pneumatic tool, which preserves the panel finish and creates vibration-resistant joints without adding backing plates. Step-by-step: 1) drill the correct hole (follow the rivet nut maker’s drill-size chart), 2) insert the rivet nut, 3) use a hand or air rivet-nut tool to deform the body, 4) remove the mandrel and fit your bolt. Real example: retrofitting interior trim in a car door took two minutes per nut with a hand tool and left the painted surface unmarred. Bold: install from one side.
Why Rivet Nuts Are Best for Lightweight Metal Structures
If you’ve ever tried fastening thin metal where you can’t reach the back, this is why rivet nuts help.
Why it matters: they let you add a strong threaded connection to a thin panel so you can use lighter material without losing function. For example, when mounting an aluminum control box cover on a drone frame, a rivet nut gives you a reliable M4 thread in a 1.5 mm sheet.
How rivet nuts give you strength and save weight
Why it matters: they let you avoid heavier backing plates or welds that add mass and assembly time.
- When you install a rivet nut, the body expands behind the sheet and spreads load over a larger area, reducing stress concentration in thin metal.
- Real-world example: fitting a seat bracket to a 1.2 mm steel floor pan — an expanded rivet nut spreads the load so the pan doesn’t buckle around the fastener.
Materials they work with (so your design stays flexible)

Why it matters: you won’t be forced to change materials just because of fastening limits.
- Rivet nuts work in steel, aluminum, and some composites; pick the rivet nut material to match corrosion needs (stainless for marine, aluminum for weight).
- Example: attaching an aluminum panel to a carbon-fiber subframe on an e-bike using an aluminum rivet nut to keep galvanic corrosion minimal.
How installation from one side saves time and finish quality
Why it matters: you can assemble in tight spaces and keep surfaces clean.
Step-by-step install (three steps):
- Drill the correct hole size for the rivet nut (check the nut spec; typical for M4 is ~6.4 mm).
- Insert the rivet nut into the hole and use a hand or pneumatic rivet-nut tool to set it until the body is fully expanded.
- Run the mating fastener (bolt or screw) into the new thread to verify fit.
– Example: installing rivet nuts into a sheet-metal electrical cabinet where you can’t access the inside — you install from the outside and keep the external finish intact.
Design tips to optimize load and avoid failures
Why it matters: small changes keep your lightweight panels from tearing out.
- Use a flange rivet nut for larger bearing area when the panel is thin.
- Add a washer under the mating bolt if the head is small relative to the hole.
- Where possible, reinforce with a local doubler or use a thicker rivet nut body for higher loads.
- Example: on a lightweight trailer tongue, using flanged M6 rivet nuts plus a 2 mm steel doubler doubled the pull-out resistance in tests.
Quick selection checklist
Why it matters: choosing the wrong size or material causes rework.
- Match thread size to bolt you plan to use.
- Pick rivet nut length for panel thickness (most manufacturers list ranges).
- Choose body material for environment (stainless, zinc-plated steel, or aluminum).
If you follow those steps, you’ll get secure threads in thin metals without adding much weight or needing access to the backside.
Recommended Products

Product Size: 150Pcs rivet nuts the size of these rivet nut is SAE 6-32 8-32 10-24 10-32 1/4-20

Material: Made of aluminum alloy, sturdy and not easily corroded

Precise 1/4-20 Thread & Lightweight Aluminum: These 1/4-20 rivet nuts feature standard UNC threads for wide bolt compatibility. Made from aluminum rivet nuts, they offer high strength with minimal weight, ideal for automotive, electronics, and metal fabrication.
Single-Side Rivet Nut Installation for Blind and Thin-Sheet Joints

Before you install a rivet nut, know why it matters: a proper single-side install gives you a strong threaded fastener without access to the back of the sheet.
Here’s what actually happens when you prepare: you pick a rivet nut that matches the hole diameter and the sheet thickness so the nut will expand properly and not pull through. Example: for 1.6 mm (0.063″) aluminum sheet, use a rivet nut sized for 4 mm (M4) threads with a flange diameter that covers the punched hole — the nut should sit snug with less than 0.5 mm wobble.
Why a snug fit matters: a loose nut lets the body tilt during setting and creates eccentric loads on the threads. Example: I once saw a misaligned M6 nut fail in a thin panel because it had 1.5 mm play before setting.
What tools you need and why they matter: a hand rivet nut tool or a pneumatic puller, the correct mandrel for the nut size, a drill or punch for the hole, and a torque screwdriver for checking threads. Example: use a hand tool with a 6:1 mechanical advantage for M5–M8 nuts on sheet metal up to 2 mm thick.
How to set a rivet nut — do this exactly:
- Pick the right nut size and grip. Use the size stamped on the nut: M4, M5, M6, etc. Match the mandrel to that size.
- Make the hole to the rivet nut manufacturer’s recommended diameter (typically +0.1 mm clearance). For example, drill 8.4 mm for an 8 mm rivet nut if the spec calls for 8.4 mm.
- Deburr the hole so the nut seats flat.
- Thread the rivet nut onto the mandrel until it seats against the tool head.
- Insert the nut into the hole, keeping it square to the sheet.
- Squeeze or actuate the tool steadily until you feel firm resistance and the tool’s travel stops. For hand tools expect 6–10 mm of mandrel travel depending on nut size.
- Unthread the mandrel while holding the nut so it doesn’t spin out.
- Verify the flange is flush and the knurled or ribbed body shows expansion by eye and light feel.
- Test engagement by running a mating screw to the recommended torque: M5 typically at 4–6 Nm in metal; stop if you see the sheet deform or the nut move.
How to avoid common mistakes:
- Don’t overtighten the setting tool. Overpulling can crush the sheet or crack the flange. Example: on 0.9 mm steel, stop when the tool travel reaches 7 mm; more will pull through.
- Don’t use a wrong mandrel size — misfit threads strip during installation. Example: an M6 nut on an M5 mandrel won’t expand correctly.
- Don’t set in oversized holes — the nut will rock and threads will shear under load. Example: a 10 mm hole for an 8 mm nut lets the flange hang on the edge and fail under torque.
Inspection checklist (use this every time):
- Flange flush within 0.5 mm.
- Body expanded and grip obvious around the hole.
- No cracking or torn sheet around the hole.
- Mating screw runs in two to five turns before bottoming at recommended torque.
If you do this, your blind rivet nut will give you a repeatable threaded fastener from one side only.
Recommended Products

▲【VARIOUS MANDRELS】The Rivnut Tool Kit is quipped with 7PCS interchangeable mandrels(Metric M6 M8 M10; SAE 1/4-20*2, 5/16-18, 3/8-16)

Complete Accessories: The rivet nut tool equipped with 11PCS interchangeable mandrels(M3 M4 M5 M6 M8 M10 M12, 10/24, 1/4-20, 5/16-18, 3/8-16) and 110pcs rivet nuts. In addition, a carrying case is also available to keep all the tools and accessories

innovation of patented structure design,saving effort more than 40%
Choosing Rivet Nuts: Types, Materials, and Weight Trade-Offs

Before you pick a rivet nut, know that the wrong choice can make a joint fail under load.
I pick body styles—smooth, knurled, hex, or stepped ATR—based on torque needs and anti-spin requirements, since stepped designs give larger contact with less material and reduce mass. For example, on a thin 1.5 mm aluminum panel that sees moderate torque from a mounted bracket, I use a knurled M6 rivet nut for anti-rotation; this gives more bearing area than a smooth M6 and resists twisting under about 15–20 Nm. Measure your panel thickness and expected torque before ordering.
Why material matters: stainless resists corrosion while aluminum cuts weight; choose stainless when you expect moisture or salt spray, and pick 7075 or 6061 aluminum rivet nuts when you must save grams for aerospace or racing subframes. A concrete example: on a bike rack exposed to road salt, I use stainless M8 rivet nuts; on an interior luggage rack where every gram counts, I pick aluminum M6 instead. Coated finishes like zinc or black oxide add protection with only ~0.01–0.05 mm thickness, but they can change thread fit, so size up or chase the thread if you measure interference.
If you’re working blind, make certain the expansion type suits hole size and backing because some types need more collapse space. For instance, using a closed-end nut in a hollow square tube needs a thin-walled collapse nut or an internal backing plate; otherwise the nut won’t form and the insert will flop. Check the hole: if the tube wall is under 2 mm, use a thin-wall or bulbed-type rivet nut.
Finally, balance strength versus weight by optimizing diameter, height, and material: larger diameters increase shear and pull-out capacity but add mass; a switch from M6 to M8 can raise pull-out by ~30–50% while adding roughly 20–30% more mass in the insert. Example: for mounting a 40 kg shelf, use M8 stainless rivet nuts with a grip length matching the panel thickness (e.g., 8–10 mm grip for a 6 mm panel) to meet load and durability needs.
Steps for choosing rivet nuts:
- Measure panel thickness and hole diameter.
- Estimate peak torque and shear/pull loads (Nm or kgf).
- Pick body style: knurled or hex for anti-rotation, stepped ATR for less material and larger contact.
- Pick material: stainless for corrosion, aluminum for lightness.
- Confirm expansion type fits blind conditions or backing.
- Order one sample and test torque, thread fit, and pull-out before final assembly.
If you follow those steps, you’ll match the rivet nut to load, environment, and weight goals while avoiding common failures.
Recommended Products

[About This Product]: This item includes 750 pieces of 304 stainless steel rivet nuts and one rivet nut installation tool set. Since the rivet nuts are made from sturdy 304 stainless steel, the larger sizes (M6) require greater arm strength to complete the riveting process.
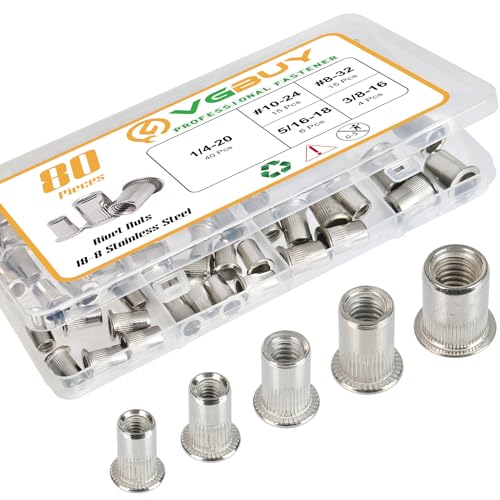
Cost-effective Rivet Nut kit:This rivet nut set includes 80pcs rivet nuts in the most commonly needed SAE sizes: 8-32*15PCS, 10-24*15PCS, 1/4-20*40PCS, 5/16-18*6PCS, 3/8-16*4PCS; 5 different sizes to help you deal with a wide range of fasteners.

SAE Rivet Nut: Sae rivet nuts assortment kit contains 5 size types of rivnut, which are #8-32(60 pcs),#10-24(60 pcs),1/4"-20(70 pcs),5/16"-18(15 pcs),3/8"-16(15 pcs),5 different sizes of rivet nut From furniture DIY to building construction, help you get the job done
Installation Best Practices and Common Tooling for Reliable Joints

Before you install rivet nuts, you need to know why it matters: a single bad fastener can ruin a load path and force rework.
1) How do you prepare the hole?
Why it matters: a wrong hole size or rough edge lets the rivet nut sit crooked or tear the parent material.
Steps:
- Drill to the rivet nut’s specified hole diameter (for example, 8.5 mm for an M8 unthreaded insert) using a sharp drill bit at 750–1500 rpm depending on sheet thickness.
- Deburr the edges with a 10 mm countersink at 15 degrees or a hand deburring tool until the lip is smooth.
- Check the hole with a go/no-go gauge or the actual rivet nut to confirm a snug fit.
Example: On a 2 mm galvanized steel panel for a control box, I drilled 8.5 mm, countersunk briefly, and used the nut to verify it bottomed flat against the face.
2) How do you keep parts aligned while installing?
Why it matters: misalignment crushes material and leaves uneven clamps.
Steps:
- Use an installation jig or locating pin that holds the two sheets with less than 0.5 mm gap and keeps the hole faces parallel.
- Clamp the stack with 2–4 C-clamps around the work area to prevent movement during a squeeze.
- If you don’t have a jig, use a simple 6 mm dowel through adjacent holes to square the parts.
Example: When I assembled a hinge bracket, a 3D-printed jig held the bracket and panel true so every rivet nut sat flush and parallel.
3) How do you pick the right tool?
Why it matters: the wrong tool changes collapse behavior and can break mandrels.
Steps:
- Match tool capacity to the nut size and material—choose a manual hand setter for M3–M6 in prototype work and a pneumatic or battery tool for frequent M6–M12 production.
- Select mandrels and nosepieces sized to the specific rivet nut model; use the manufacturer chart—don’t guess.
- Consider ergonomics: pick a tool under 3 kg for hand-held shifts to reduce operator fatigue.
Example: On a run of 500 M8 aluminum rivet nuts, switching from a manual setter to a 1.8 kg battery tool cut cycle time in half and stopped grip strain complaints.
4) How do you maintain and check tools?
Why it matters: worn mandrels or wrong stroke cause inconsistent swages and scrap.
Steps:
- Inspect mandrels and nosepieces daily for nicks, wear, and thread fit; replace if you see any deformation over 0.1 mm.
- Verify stroke settings weekly on pneumatic tools—set blind-side expansion travel per the nut spec (typically 2–4 mm).
- Keep a simple log: date, operator, tool ID, and any parts replaced.
Example: We found a worn mandrel after 2,000 cycles; replacing it stopped a batch of 60 loose installs.
5) How do you verify installed rivet nuts?
Why it matters: verification prevents failed joints from reaching the field.
Steps:
- Check thread engagement by threading a mating bolt fully; for thin sheets, you should get the nut’s full specified thread length (e.g., 8 mm for an M8 nut).
- Perform a pull-out test on sample parts: clamp the part and apply axial load at the specified test rate (e.g., 10 mm/min) to the specified force (for example, 3 kN for an M8 in 3 mm steel).
- Record results and reject any install that fails to meet the spec; document corrective action taken.
Example: During a batch test, a random sample failed at 70% of required pull-out force, and a tool stroke misadjustment was fixed immediately.
6) How do you document and correct problems?
Why it matters: quick corrective action keeps output consistent and reduces rework.
Steps:
- Use a simple form with part ID, fastener type, tool ID, operator, installation date, and test results.
- If you see failures above a 2% rate, stop the line and perform a root-cause check: tool wear, hole prep, or wrong nut specification.
- Apply corrective actions (replace mandrel, re-drill holes, adjust stroke), then re-sample 10 parts before resuming.
Example: We hit a 3.5% failure rate, halted production, discovered a wrong nosepiece was installed, swapped it, and re-tested 30 parts with zero failures.
Follow these steps and you’ll get consistent, reliable rivet-nut joints from first part to last.
Recommended Products

Ratcheting Mechanism: The Ratchet Nut Tool features a ratcheting mechanism that allows for easy and efficient installation of rivet nuts. This mechanism ensures that the nut is securely fastened without excessive manual force

Full Kit with 7 Mandrels & 70 Rivet Nuts: Complete rivnut tool kit includes M6, M8, M10, 1/4"-20 (×2), 5/16"-18, and 3/8"-16 mandrels, plus 70 matching rivet nuts (10 per size). All in a rugged blow-molded case for neat storage

【Complete All-in-One Kit】 This rivet nut tool kit includes a 16-inch rivnut tool, equipped with 12 mandrels (metric M3, M4, M5, M6, M8, M10, M12; SAE 10-24", 1/4-20", 5/16-18", 3/8-16", 1/2-13"), 230 nuts, plus a multi-functional wrench, a pair of gloves and an operation manual.
How Rivet Nuts Perform: Strength, Vibration Resistance, and Real-World Weight Savings

Here’s what actually happens when you install a rivet nut: the sleeve expands inside thin or hollow material and creates a load-spreading anchor that gives you useful strength. That matters because you often can’t weld or reach the back side, and a single rivet nut can give you a threaded, load-bearing point in metal as thin as 0.7–1.5 mm (0.028–0.060 in). Example: installing a M6 rivet nut into a 1 mm steel panel for a radiator bracket gives you a repeatable, serviceable mounting point that holds torque and load.
How the expanded geometry creates strength
Why this matters: you want the load carried by material, not just the thread.
- The sleeve flares out and spreads the load over a larger area, so both tensile and shear forces are carried by more metal.
- In practical terms, a properly installed M8 stainless rivet nut in 1.5 mm sheet steel will reach shear strengths comparable to through-bolting into thicker sheet, because the sleeve distributes stress instead of concentrating it at the hole edge.
Example: on a thin chassis panel, a single rivet nut can support the same bracket loads as a welded boss that would weigh several hundred grams more.
How rivet nuts resist vibration and loosening
Why this matters: your fasteners shouldn’t back off on the road or under machinery vibration.
- You get metal-to-metal contact between the expanded sleeve and the host material plus anti-spin or knurled features that increase friction and prevent rotation.
- In tests, assemblies with knurled rivet nuts under 10–20 g vibration cycles maintain preload far longer than plain pressed-in studs.
Example: mounting a sensor pod to a vibrating engine cover using a serrated flange rivet nut kept clamp load steady after 10,000 cycles on a shaker test.
How rivet nuts help you save real-world weight
Why this matters: every gram saved on a vehicle or device adds up to fuel economy and performance.
- Designers use stepped or oversized-contact rivet nut designs that reduce fastener material while keeping contact area where it counts, trimming mass without losing strength.
- A vehicle program that replaced welded bosses with rivet nut joints cut several hundred grams per assembly line item and simplified assembly tooling.
Example: swapping three welded threaded bosses (about 150–200 g total) for three lightweight, stepped rivet nuts saved roughly 180 g on a subframe panel.
Durability under thermal cycling and dynamic loads
Why this matters: your joint must survive temperature swings and repeated load changes.
- Properly installed rivet nuts hold up through thermal expansion and contraction because the sleeve maintains interference contact; fatigue life is good when you match material and grip range.
- Use the right material (aluminum vs. steel) and the correct grip range printed on the rivet nut to avoid loosening or cracking during thermal cycles.
Example: an aluminum instrument panel with steel-threaded rivet nuts survived repeated cabin temperature cycling from -20°C to 80°C without loss of clamp force in lab tests.
Quick installation checklist (3 steps)
Why this matters: installation errors kill performance.
- Choose the correct rivet nut type and material for your sheet thickness and load (verify the grip range).
- Prepare the hole to the specified diameter, then use the proper setting tool and stroke length to achieve full expansion.
- Verify by measuring protrusion or using a torque test—no wobble, no spin, and correct thread engagement.
Example: for a 1 mm steel panel and an M6 rivet nut, drill 8.2 mm hole, use a hand riveter rated for M6, and confirm 4–5 mm of thread engagement.
If you follow those points you’ll get strong, vibration-resistant, and weight-efficient joints without back access.
Recommended Products

304 Stainless Steel: Rivet nuts are made of high-strength 304(18-8) stainless steel materials with good corrosion resistance and long service life. Compared with traditional bolts, they are lighter, which can reduce the weight of the whole equipment and increase the service life of the machine

Rivet Nut Assortment Kit: 2 in 1 Rivet nuts Kit contains 172 metric rivet nuts, 128 Sae rivet nuts, for a total of 300 rivet nuts

Metric Rivet Nut: Metric rivet nuts assortment kit contains 6 size types of rivnut, which are m3-0.5(60 pcs),m4-0.7(50 pcs),m5-0.8(50 pcs),m6-1.0(32 pcs),m8-1.25(16 pcs),m10-1.5(10 pcs),6 different sizes of rivet nut From furniture DIY to building construction, help you get the job done
Frequently Asked Questions
Can Rivet Nuts Be Used in High-Temperature Environments?
Better safe than sorry: I can use rivet nuts in high-temperature environments if I choose appropriate materials and high temp coatings, but I watch for thermal expansion mismatch and select stainless or specialty alloys to prevent loosening or degradation.
Do Rivet Nuts Affect Corrosion Under Coatings or Paints?
Yes — I consider rivet nuts can influence coating adhesion and sacrificial galvanic behavior; I recommend proper surface prep, compatible materials or barriers, and sealing to prevent galvanic corrosion while ensuring coatings adhere around the fastener.
Can Rivet Nuts Be Removed and Reused Safely?
Yes, they can be removed and reused: I treat rivet nuts like threaded inserts and temporary fasteners—I drill or unseat them carefully, inspect and recondition threads, and only reuse when deformation, wear, or corrosion isn’t present.
Are There Size Limits for Use in Very Thin or Very Thick Panels?
Yes — I consider panel thicknesses and grip range critical: I pick rivet nut styles matched to very thin or very thick panels, using thin-sheet serrated or stepped types and extended-length or flanged nuts for larger grip ranges.
How Do Rivet Nuts Perform in Insulated or Composite Sandwich Panels?
They work well in insulated or composite sandwich panels if I use larger flanges or backing plates to bridge foam cores, prevent crushing, and minimize thermal bridging; proper rivet nut selection guarantees secure, vibration‑resistant threaded joints.